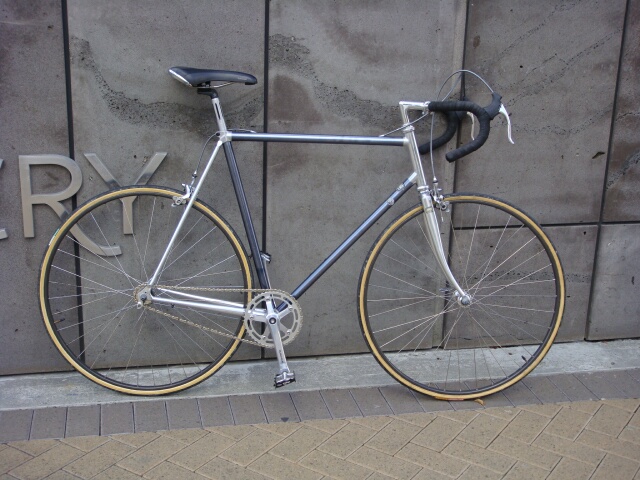
Building the rear wheel for a fixed gear bike
|
|
|
|
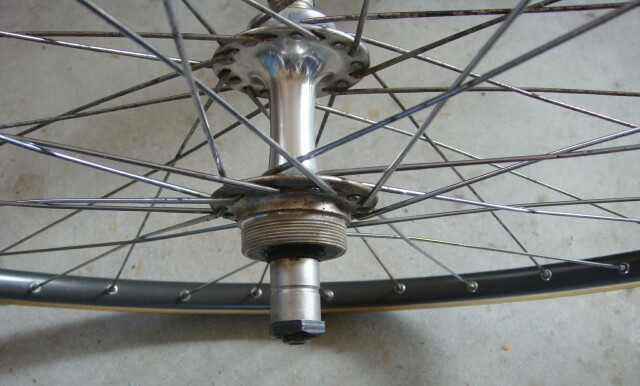
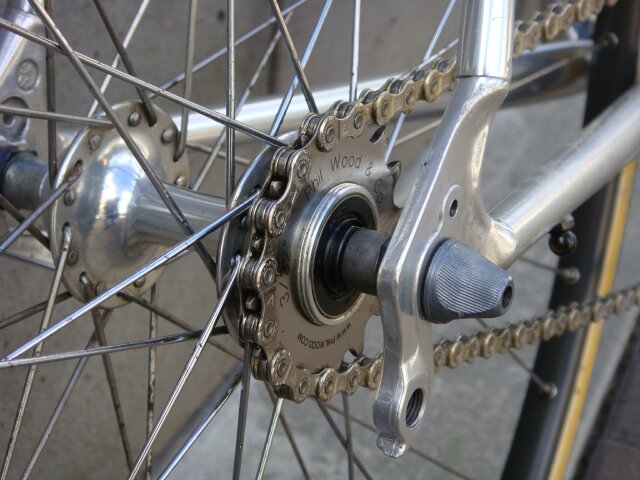
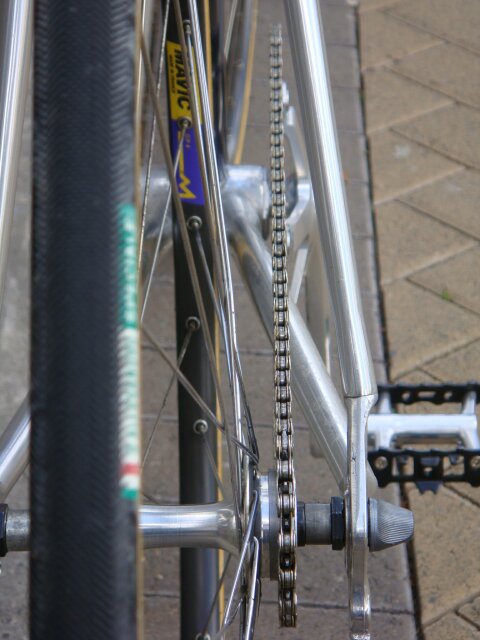
Bicycles originally designed as fixed gear bikes have a track hub in the rear wheel. Track hubs are unfortunately not common every day items and are therefore expensive. This article describes how to achieve the same result as a track hub using the wheel from the donor road bike that you are converting to a fixed gear, both quickly and cheaply. Worth contemplating before embarking on this build is whether this shortcut will be suitable for your bike. A track hub has a lock ring that prevents the sprocket from unscrewing and coming off during hard braking using the pedals. A road hub does not have this feature, and it is therefore possible that under extreme braking that your sprocket will unscrew. It's unlikely but it is possible. This will at the very least mess up your paintwork, but may cause the chain to jam in your frame causing you to skid, possibly crash, injury and even death. Or all of the above in quick (or painfully slow) succession. For this reason do not rely on using your pedals alone to stop, but add two brakes as well. Just as I did on the bike above. If you are wanting to rely solely on using your pedals to stop it would be wise to pay the extra and buy a proper track hub, though even then your chain might break causing paint loss, jam, skid, crash, pain, death... Brakes are good. In my article on the Yellow-Bird fixed gear conversion I glossed over the process of building the rear wheel. The rear wheel for a fixed gear is a little different to a typical rear wheel, and depending on your choice of bike for the conversion, the donor wheel you have may be very easy or very difficult (that is to say time consuming and/or expensive) to convert and use. A rear wheel on a usual, non fixed-gear bike, has some mechanism whereby the rider can stop pedalling and the wheel will continue to turn. This free-wheeling mechanism is achieved either by using a freewheel, which is a ratchet mechanism that is built into the set of sprockets that are screwed onto the rear hub of a multi gear bike, or a freehub, where the ratchet mechanism is built into the hub (and the sprockets don't screw but slide onto the hub). On a fixed gear bike we don't want the ability to free-wheel, so this free-wheeling mechanism must be removed. If your wheel is fitted with a freewheel, you can simply unscrew it and screw on a track style sprocket in its place; track sprockets are designed for a 1.375" x 24 tpi hub, and this is almost certainly what the thread on your hub will also be. This procedure is quite easy to do and I have documented it in this article. If on the other hand your wheel has a freehub you either need to exchange the hub for a regular hub (which involves building a new wheel very likely with new spokes!), or you can buy a device from Surly that locks the freehub mechanism. This latter option is easy, but the item is expensive. As well as getting rid of the freewheeling mechanism in the wheel, it is also necessary to make sure the offset of the sprocket is correct so that your chainline is straight. It is very important on a fixed gear bike that the chain does not come off when riding; you will at least lose your ability to brake using the pedals, and at worst the chain will jam somewhere in the frame and the rear wheel will lock up causing an unexpected skid. The jammed chain may well damage the frame (it will certainly mess up the paint), and the skid will quite possibly cause you to crash. So it is a good idea to make sure your chain-ring and rear sprocket are in a nice straight line in order to avoid this unpleasantness. For this rear wheel I decided to use an old tubular racing wheel. Clincher rim or tubular rim doesn't matter, but I chose this wheel because it has a screw-on hub, the sort that normally is used with a free-wheel. Using the correct free-wheel tool (I recommend Park Tools), I simply unscrewed the freewheel and screwed the track sprocket on in its place. No tool is necessary to tighten the sprocket as this is done by the normal pedalling motion.
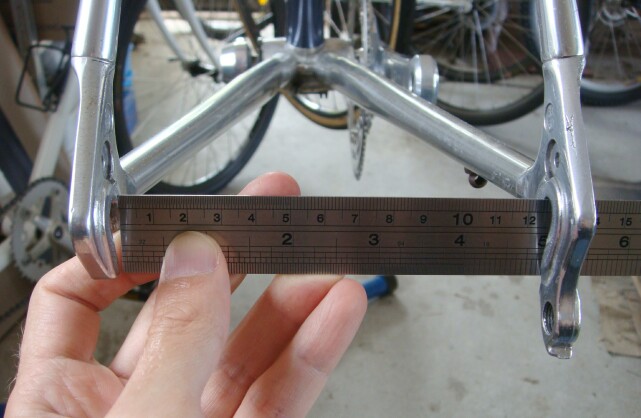
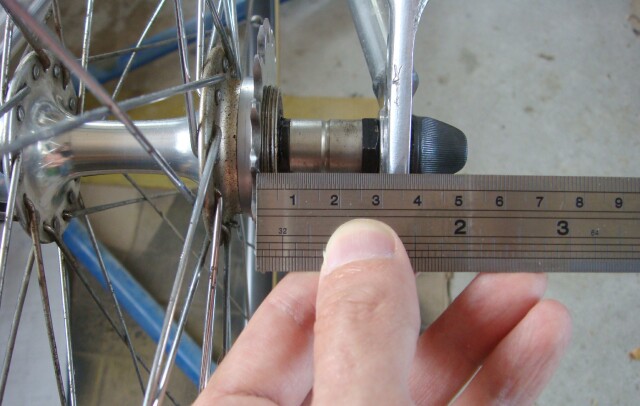
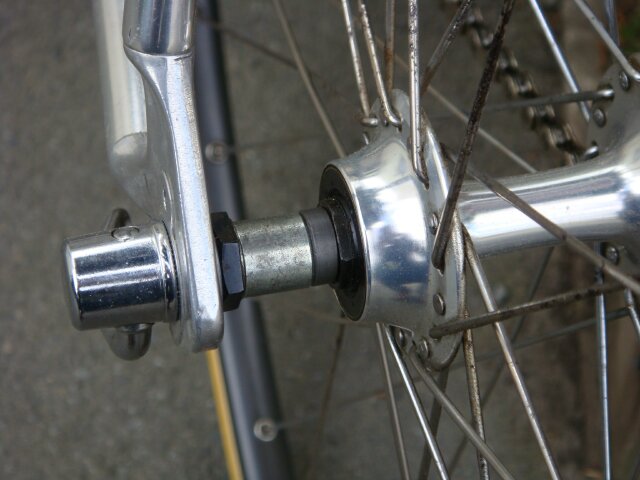
The wheel I chose was actually quite old and corroded so I put a drop of oil on each of the spoke nipples to make their adjustment easier. I also removed the tire so that I could oil the tire side of the nipples as well. I then put the wheel to one side for a few days to let the oil soak in. If you have penetrating oil, that might be worth using in such a case as you will see later that some nipples still wouldn't budge. Some time later... Getting the over locknut spacing right was the next step. The spacing between the outside of the nuts on the axle of the wheel must closely match (say within 1-2mm) the frame into which the wheel is to be fitted. This is to avoid undue stress and bending of the frame when the wheel is fastened in place. A little bending is OK, but aluminium alloy and carbon frames are less forgiving than steel. I measured the spacing between the rear drop-outs on the frame; the spacing of the frame. This was 124mm, which happens to be very close to 126mm which itself is a common standard value for older road bikes.
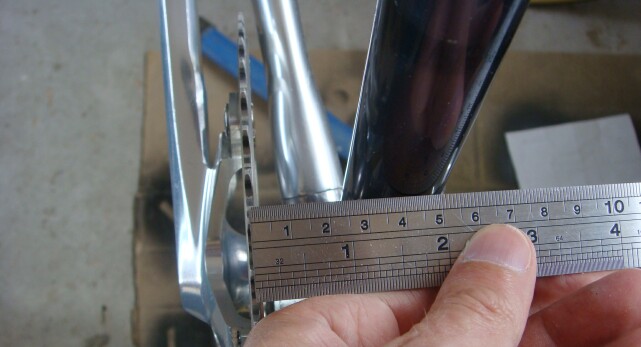
The donor wheel was originally off an old racing bike which had a 126mm frame spacing, and it fitted right into the new frame (124mm spacing) without much trouble. The 2mm difference isn't much in the scheme of things, though ideally there should be no stretching or squashing of the frame at all once the wheel is installed. If it had not fitted I could have altered the spacing of the wheel by adding or removing the spacers between the outer locknuts on the axle. Next I worked on getting the sprocket offset correct. I first started by measuring the distance from the centre-line of the chain-ring to the centre-line of the bike. In this case the measurement was 42mm. 42mm is a standard used on track bikes, but in this case the fact it's 42mm is purely coincidental.
If the chainring is 42mm from the centre-line of the bike, then the rear sprocket should have the same offset. Now there's no easy way to measure from the exact centre-line of the bike at the rear, but we can work out the spacing from the inside of the right hand drop-out. So let's see; the rear frame spacing is 124mm, putting the centre-line at half that, or 62mm from the inside of the right dropout. Now we want the rear sprocket to be offset from the centre-line by 42mm, which is 62-42, or 20mm. So the centre of the rear sprocket should be 20mm from the inside of the right dropout. This can be tweaked by eye later if you want to get it exact. Unfortunately, while the hub fitted into the frame (the over locknut measurement was close enough to the frame spacing), the offset of the sprocket was wrong with the sprocket being too far over to the centre-line of the bike. This would not give a nice straight chain-line so something had to be done to correct it.
I fixed this by adding extra spacer length on the left hand side and removing it on the right. It's always handy to have a pile of old donor hubs lying around from which you can scrounge some spacers of varying widths. After some fiddling I had removed spacers from the right hand side so that I reached the magic 20mm calculated above. It was then easy to add spacers to the left to make the wheel fit the frame spacing, 124mm.
With the sprocket lined up with the chain-ring and a trial chain in place to help eyeball their alignment things were looking good, but now the rim was off centre to the right. I needed to bring the rim back in line, and quite a way too. Fortunately the design of the rim meant that I could tighten spokes on the left side quite a lot before they would poke up above the surface of the rim and cause tire damage. The right hand spokes had enough thread on the nipple that I could updo them quite a way. This was good as it meant I didn't need to buy new spokes of a different length.
Before adjusting the spokes it's a good idea to check the tension to see where the wheel is at. Hopefully the wheel was built correctly in the beginning and you can use this fact to pling each spoke (say with a screwdriver) and listen to the pitch. If you end up with a similar pitch at the end of the build the tension in your spokes should be OK and your wheel should be strong enough. Alternatively you could buy a spoke tension device in order to do it properly, though they're quite expensive. If you pling each spoke you will also get an idea if the wheel has been trued at some time as the pitches of spokes will vary, possibly quite a lot on a badly damaged wheel. Also worth considering is whether the rim is currently running true, without any major wobbles. If the wheel is not running true it will be more difficult to bring in line. Just something to be wary of. If you manage to play Mary had a little lamb, it's either out of true, has been repaired (trued) at some stage, or you've been tapping the wheel for just a little too long... Having a decent spoke wrench tool makes the tension adjustment job much easier. I have a Park Tool spoke wrench which I have found to work well. I also have a spoke multi-tool that has all the common spoke sizes, but because of this fact it's slower to use. When you have to go from one spoke to the next lots of times, ease of use and speed does make a difference. Do not even think about using an adjustable wrench. I tried this as a kid. It rounds off the spoke nipples very nicely meaning the spoke has to be cut and replaced. I started loosening all the spokes on the right hand side by exactly one turn each, starting at the valve hole so I could keep track of where I was up to. Some nipples refused to turn, so for those I cut the spoke with some pliers and replaced it with a new spoke, bringing it up to the same tension as the spokes around it. Pling the adjoining spokes before cutting the problem spoke so as to be most accurate when gauging the tension required on the replacement spoke. For example, if the problem spoke sounds a little lower than the adjoining spokes, replace it, then tune the replacement to sound a little lower than the adjoining spokes. In total I had to replace four stubborn spokes. Next I loosened all the right hand spokes by two turns, then another two turns. By now the wheel was starting to get a bit loose, but was still holding its shape. Next I tightened the left hand side spokes each two turns. Then I repeated the loosening one side and tightening the other side process until the rim was centered. You can use a ruler to measure the distance from the brake surface on the rim to the frame (a seat stay is convenient), doing this on both sides of the wheel to work out when the reading is the same and therefore when the wheel is centered. You could also just work by eye, which is surprisingly accurate. It's probably best not to tighten or loosen individual spokes too much in one go, particularly when they are already quite tight. It's much better (though slower) to tighten or loosen each spoke a little at a time as this keeps the overall tension in the wheel more constant. You're also less likely to get into the nasty situation where you are half way round the wheel and it's now getting really difficult to tighten the spokes, and you have to try and go back and loosen some of the over-tight ones... I stick to at most half turns at a time when the wheel is near final tension, otherwise full turns when at mid tension or two turns when the wheel is quite loose or I'm trying to loosen it up. If the spokes start to get too tight at any time, just back off the spokes on the side you're moving the rim away from. Likewise if things get too loose and out of shape, tighten the spokes on the side you're moving the rim toward. In due course once the rim reached the centre-line I then tightened up all spokes to a tension similar to that before I started modifying the wheel. Some side to side wobble was present, but this was removed by tightening spokes on one side and loosening the same amount on the other side of the rim, just at the problem spot. I used a flat head screwdriver held against the frame and just touching the rim (the seat stays act as a guide) to measure the peaks of the wobble.
Now it's just a matter of putting a tire on the wheel and trying it out. The first time you get on the bike the wheel will probably creak a little as the spokes settle. I like to ride around on the driveway, slowly, until the noises stop. Then I get off the bike and check to make sure the wheel is still spinning true, and that no spokes have way off tensions. Pling, pling, pling... | |
Questions and comments regarding this article can be sent to

More fixed-gear content at www.fixedgear.nz
(c)opyright 2008
Martin van den Nieuwelaar,
Last updated 11 Jul 2017
